Admin and user login in php and mysql database
Today we are going to build a registration system that keeps track of which users are admin and which are normal users. The normal users in our application are not allowed to access admin pages. All users (Admins as well as normal users) use the same form to login. After logging in, the normal users are redirected to the index page while the admin users are redirected to the admin pages.
Subscribe TechTalk for more Video Tutorials
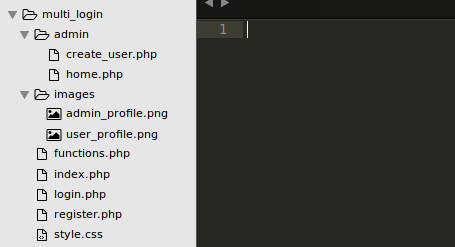
So let's start with creating the files, shall we? Navigate to the folder on your machine that is accessible to the server (that is, htdocs if you are using xampp and www if you're using wampp), and create the following files and folders:

Now open up register.php in your favorite text editor and let's start writing some code.
In our blank register.php file, let's add this code:
<!DOCTYPE html>
<html>
<head>
 <title>Registration system PHP and MySQL</title>
</head>
<body>
<div class="header">
 <h2>Register</h2>
</div>
<form method="post" action="register.php">
 <div class="input-group">
  <label>Username</label>
  <input type="text" name="username" value="">
 </div>
 <div class="input-group">
  <label>Email</label>
  <input type="email" name="email" value="">
 </div>
 <div class="input-group">
  <label>Password</label>
  <input type="password" name="password_1">
 </div>
 <div class="input-group">
  <label>Confirm password</label>
  <input type="password" name="password_2">
 </div>
 <div class="input-group">
  <button type="submit" class="btn" name="register_btn">Register</button>
 </div>
 <p>
  Already a member? <a href="login.php">Sign in</a>
 </p>
</form>
</body>
</html>
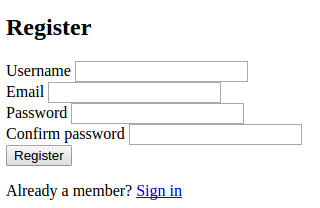
If we fire up our browser and view this, here's what we get:

That doesn't look cool. Let's do something about it.
Add a link to the css file right under the <title></title> tag in the head section of the register.php file. Like so:
<link rel="stylesheet" href="style.css">Then open up style.css file and spit out this css code in it:* { margin: 0px; padding: 0px; }
body {
font-size: 120%;
background: #F8F8FF;
}
.header {
width: 40%;
margin: 50px auto 0px;
color: white;
background: #5F9EA0;
text-align: center;
border: 1px solid #B0C4DE;
border-bottom: none;
border-radius: 10px 10px 0px 0px;
padding: 20px;
}
form, .content {
width: 40%;
margin: 0px auto;
padding: 20px;
border: 1px solid #B0C4DE;
background: white;
border-radius: 0px 0px 10px 10px;
}
.input-group {
margin: 10px 0px 10px 0px;
}
.input-group label {
display: block;
text-align: left;
margin: 3px;
}
.input-group input {
height: 30px;
width: 93%;
padding: 5px 10px;
font-size: 16px;
border-radius: 5px;
border: 1px solid gray;
}
#user_type {
height: 40px;
width: 98%;
padding: 5px 10px;
background: white;
font-size: 16px;
border-radius: 5px;
border: 1px solid gray;
}
.btn {
padding: 10px;
font-size: 15px;
color: white;
background: #5F9EA0;
border: none;
border-radius: 5px;
}
.error {
width: 92%;
margin: 0px auto;
padding: 10px;
border: 1px solid #a94442;
color: #a94442;
background: #f2dede;
border-radius: 5px;
text-align: left;
}
.success {
color: #3c763d;
background: #dff0d8;
border: 1px solid #3c763d;
margin-bottom: 20px;
}
.profile_info img {
display: inline-block;
width: 50px;
height: 50px;
margin: 5px;
float: left;
}
.profile_info div {
display: inline-block;
margin: 5px;
}
.profile_info:after {
content: "";
display: block;
clear: both;
}
This css code will be used for styling our entire application.
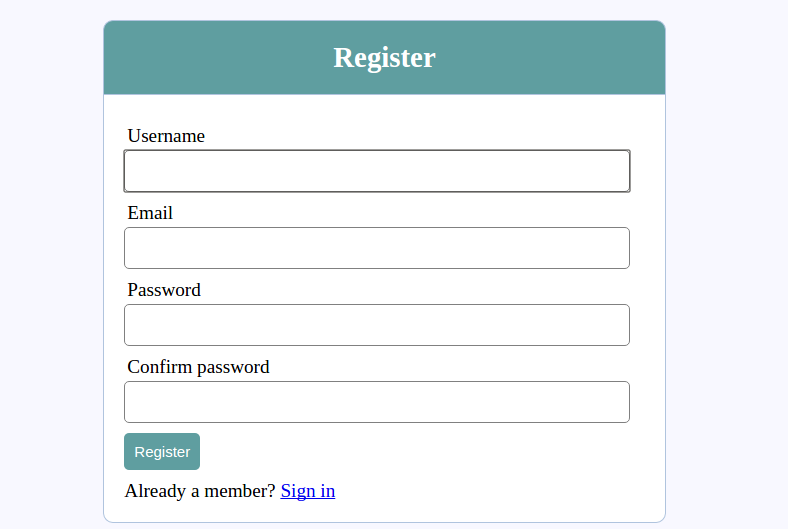
If we refresh the register.php page on the browser, we get this beauty:

What we want now is for the user to fill the form and press the register button so that the info can be saved in the database. So we move on to the next step.
Let's create a database called multi_login. In multi_login database, create a table called users with the following fields:
- id - int(10)
- username - varchar(100)
- email - varchar(100)
- user_type - varchar(100)
- password - varchar(100)
That's all we need for our database.Let's move over to our register.php file once again and do some modifications.
First we should make sure the form's method attribute is set to post and that the action attribute is set to register.php meaning that when the register button is clicked, the form values are submitted to the same page.
Let's now write the code to receive these values and stores them in the database. But it is my custom to avoid, as much as possible, mixing up php code in html so I'll go ahead and create a functions.php file to put this code inside and then make this code available in the register.php file.
At the very top (first line) of register.php file, add this line of code:
<?php include('functions.php') ?>
//...
Also, we want that when the user doesn't enter the form values correctly, error messages should be displayed guiding them to do it correctly. In the same register.php file, right after the opening <form> tag, add this code
<form method="post" action="register.php">
 <?php echo display_error(); ?>
//...
</form>
The display_error() is a simple function we are going to define shortly.
One last thing in the register.php file: Modify the username and email input fields by setting their value attributes to corresponding variables. Like so:
<input type="text" name="username" value="<?php echo $username; ?>">
<input type="email" name="email" value="<?php echo $email; ?>">
We'll define the $username and $email variables soon...
Now open up the empty functions.php file and add this code in it:
<?php
session_start();

// connect to database
$db = mysqli_connect('localhost', 'root', '', 'multi_login');

// variable declaration
$username = "";
$email    = "";
$errors   = array();

// call the register() function if register_btn is clicked
if (isset($_POST['register_btn'])) {
 register();
}

// REGISTER USER
function register(){
 // call these variables with the global keyword to make them available in function
 global $db, $errors, $username, $email;

 // receive all input values from the form. Call the e() function
    // defined below to escape form values
 $username    =  e($_POST['username']);
 $email       =  e($_POST['email']);
 $password_1  =  e($_POST['password_1']);
 $password_2  =  e($_POST['password_2']);

 // form validation: ensure that the form is correctly filled
 if (empty($username)) {
  array_push($errors, "Username is required");
 }
 if (empty($email)) {
  array_push($errors, "Email is required");
 }
 if (empty($password_1)) {
  array_push($errors, "Password is required");
 }
 if ($password_1 != $password_2) {
  array_push($errors, "The two passwords do not match");
 }

 // register user if there are no errors in the form
 if (count($errors) == 0) {
  $password = md5($password_1);//encrypt the password before saving in the database

  if (isset($_POST['user_type'])) {
   $user_type = e($_POST['user_type']);
   $query = "INSERT INTO users (username, email, user_type, password)
       VALUES('$username', '$email', '$user_type', '$password')";
   mysqli_query($db, $query);
   $_SESSION['success']  = "New user successfully created!!";
   header('location: home.php');
  }else{
   $query = "INSERT INTO users (username, email, user_type, password)
       VALUES('$username', '$email', 'user', '$password')";
   mysqli_query($db, $query);

   // get id of the created user
   $logged_in_user_id = mysqli_insert_id($db);

   $_SESSION['user'] = getUserById($logged_in_user_id); // put logged in user in session
   $_SESSION['success']  = "You are now logged in";
   header('location: index.php');
  }
 }
}

// return user array from their id
function getUserById($id){
 global $db;
 $query = "SELECT * FROM users WHERE id=" . $id;
 $result = mysqli_query($db, $query);

 $user = mysqli_fetch_assoc($result);
 return $user;
}

// escape string
function e($val){
 global $db;
 return mysqli_real_escape_string($db, trim($val));
}

function display_error() {
 global $errors;

 if (count($errors) > 0){
  echo '<div class="error">';
   foreach ($errors as $error){
    echo $error .'<br>';
   }
  echo '</div>';
 }
}
Easy right?
If you observe keenly you can now see the difference between a user and an admin. In the register() function, the user is being saved as admin if the user_type variable was sent in the post request or as user, if no user_type was sent. Since our form doesn't have any field for the user_type, it is obvious that the user we are creating will be saved as user and not admin.
When a user is registered, we get the last inserted id (id of the registered user) and log them in. From the user's id, we are able to get all the other attributes of the user using the getUserById() function. After getting the user, we put them in the session variable as an array called user.
Storing the user in a session variable means that the user is available even if you refresh and navigate to other pages (where session has been started). The user variable in the session doesn't get lost; it can only be lost by unsetting it (this is how we log the user out. Coming soon...).
Now back to our registration form, you notice that when you input values and click the register button, you are redirected to the index.php page. But it's blank. So let's make it look like an index page.
Open up index.php file in your text editor and put the following code in it.
<?php
 include('functions.php');
?>
<!DOCTYPE html>
<html>
<head>
 <title>Home</title>
 <link rel="stylesheet" type="text/css" href="style.css">
</head>
<body>
 <div class="header">
  <h2>Home Page</h2>
 </div>
 <div class="content">
  <!-- notification message -->
  <?php if (isset($_SESSION['success'])) : ?>
   <div class="error success" >
    <h3>
     <?php
      echo $_SESSION['success'];
      unset($_SESSION['success']);
     ?>
    </h3>
   </div>
  <?php endif ?>
  <!-- logged in user information -->
  <div class="profile_info">
   <img src="images/user_profile.png"  >

   <div>
    <?php  if (isset($_SESSION['user'])) : ?>
     <strong><?php echo $_SESSION['user']['username']; ?></strong>

     <small>
      <i  style="color: #888;">(<?php echo ucfirst($_SESSION['user']['user_type']); ?>)</i>
      <br>
      <a href="index.php?logout='1'" style="color: red;">logout</a>
     </small>

    <?php endif ?>
   </div>
  </div>
 </div>
</body>
</html>
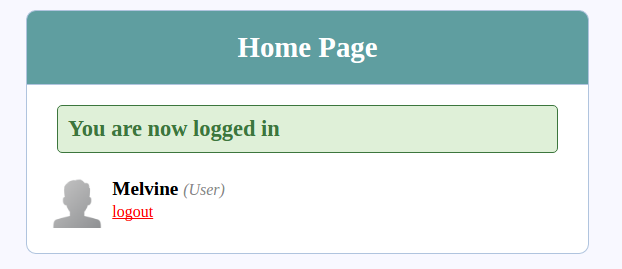
Now if you register a new user, it logs them in and redirects them to an index page that looks like this:

That looks cool.
Just one tiny problem. If a person types the right url to this index.php page in the browser, they will be able to access this page without even logging in. We don't want that right? Let's fix it.
Let's visit our functions.php file once again and add this function at the bottom of the file:
function isLoggedIn()
{
 if (isset($_SESSION['user'])) {
  return true;
 }else{
  return false;
 }
}
This function when called, tells you if a user is logged in or not by returning true or false.
Open the index.php file (or any file you want accessible only to logged in users) and paste this code right after the include statement at the top of the file:
<?php
include('functions.php');
if (!isLoggedIn()) {
 $_SESSION['msg'] = "You must log in first";
 header('location: login.php');
}

//...
If the user is not logged in and tries to access this page, they are automatically redirected to the login page.
To log the user out, let's add this code in the functions.php file:
// log user out if logout button clicked
if (isset($_GET['logout'])) {
 session_destroy();
 unset($_SESSION['user']);
 header("location: login.php");
}
At this point we can say we are done with user registration.
To do user login is even easier.
Open your login.php file and paste this code in it:
<?php include('functions.php') ?>
<!DOCTYPE html>
<html>
<head>
 <title>Registration system PHP and MySQL</title>
 <link rel="stylesheet" type="text/css" href="style.css">
</head>
<body>
 <div class="header">
  <h2>Login</h2>
 </div>
 <form method="post" action="login.php">

  <?php echo display_error(); ?>

  <div class="input-group">
   <label>Username</label>
   <input type="text" name="username" >
  </div>
  <div class="input-group">
   <label>Password</label>
   <input type="password" name="password">
  </div>
  <div class="input-group">
   <button type="submit" class="btn" name="login_btn">Login</button>
  </div>
  <p>
   Not yet a member? <a href="register.php">Sign up</a>
  </p>
 </form>
</body>
</html>One last thing, add this if statement and this function inside functions.php:
// call the login() function if register_btn is clicked
if (isset($_POST['login_btn'])) {
login();
}
// LOGIN USER
function login(){
global $db, $username, $errors;
// grap form values
$username = e($_POST['username']);
$password = e($_POST['password']);
// make sure form is filled properly
if (empty($username)) {
array_push($errors, "Username is required");
}
if (empty($password)) {
array_push($errors, "Password is required");
}
// attempt login if no errors on form
if (count($errors) == 0) {
$password = md5($password);
$query = "SELECT * FROM users WHERE username='$username' AND password='$password' LIMIT 1";
$results = mysqli_query($db, $query);
if (mysqli_num_rows($results) == 1) { // user found
// check if user is admin or user
$logged_in_user = mysqli_fetch_assoc($results);
if ($logged_in_user['user_type'] == 'admin') {
$_SESSION['user'] = $logged_in_user;
$_SESSION['success'] = "You are now logged in";
header('location: admin/home.php');
}else{
$_SESSION['user'] = $logged_in_user;
$_SESSION['success'] = "You are now logged in";
header('location: index.php');
}
}else {
array_push($errors, "Wrong username/password combination");
}
}
}
Basically what this does is: if the login button is clicked, the login() function is called which logs the user in. Notice that when the user is logged in, it also does a check: if the user is admin, it redirects them to the admin/home.php page. If however, it is just a normal user, he/she is redirected to the index.php page.
Now let's get to work on the admin site. We are going to be using the files in the admin folder (create_user and home.php). These files are available only to admin users, which means only an admin can create another admin.
Open up create_user.php and paste this code in it:
<?php include('../functions.php') ?>
<!DOCTYPE html>
<html>
<head>
 <title>Registration system PHP and MySQL - Create user</title>
 <link rel="stylesheet" type="text/css" href="../style.css">
 <style>
  .header {
   background: #003366;
  }
  button[name=register_btn] {
   background: #003366;
  }
 </style>
</head>
<body>
 <div class="header">
  <h2>Admin - create user</h2>
 </div>

 <form method="post" action="create_user.php">

  <?php echo display_error(); ?>

  <div class="input-group">
   <label>Username</label>
   <input type="text" name="username" value="<?php echo $username; ?>">
  </div>
  <div class="input-group">
   <label>Email</label>
   <input type="email" name="email" value="<?php echo $email; ?>">
  </div>
  <div class="input-group">
   <label>User type</label>
   <select name="user_type" id="user_type" >
    <option value=""></option>
    <option value="admin">Admin</option>
    <option value="user">User</option>
   </select>
  </div>
  <div class="input-group">
   <label>Password</label>
   <input type="password" name="password_1">
  </div>
  <div class="input-group">
   <label>Confirm password</label>
   <input type="password" name="password_2">
  </div>
  <div class="input-group">
   <button type="submit" class="btn" name="register_btn"> + Create user</button>
  </div>
 </form>
</body>
</html>
Besides styling, the main difference between this page and the register page is the option-select field in the create_user.php page that permits the admin to specify the user type. Therefore an admin can create a normal user as well as an admin.
I'll just go ahead and paste the complete code of home.php inside the file. Here it is:
<?php
include('../functions.php');
if (!isAdmin()) {
$_SESSION['msg'] = "You must log in first";
header('location: ../login.php');
}
if (isset($_GET['logout'])) {
session_destroy();
unset($_SESSION['user']);
header("location: ../login.php");
}
?>
<!DOCTYPE html>
<html>
<head>
<title>Home</title>
<link rel="stylesheet" type="text/css" href="../style.css">
<style>
.header {
background: #003366;
}
button[name=register_btn] {
background: #003366;
}
</style>
</head>
<body>
<div class="header">
<h2>Admin - Home Page</h2>
</div>
<div class="content">
<!-- notification message -->
<?php if (isset($_SESSION['success'])) : ?>
<div class="error success" >
<h3>
<?php
echo $_SESSION['success'];
unset($_SESSION['success']);
?>
</h3>
</div>
<?php endif ?>
<!-- logged in user information -->
<div class="profile_info">
<img src="../images/admin_profile.png" >
<div>
<?php if (isset($_SESSION['user'])) : ?>
<strong><?php echo $_SESSION['user']['username']; ?></strong>
<small>
<i style="color: #888;">(<?php echo ucfirst($_SESSION['user']['user_type']); ?>)</i>
<br>
<a href="home.php?logout='1'" style="color: red;">logout</a>
<a href="create_user.php"> + add user</a>
</small>
<?php endif ?>
</div>
</div>
</div>
</body>
</html>
At the top of this file, there is an if statement that checks if the user is admin (using the isAdmin() function). Let's add that function to our functions.php file:
// ...
function isAdmin()
{
 if (isset($_SESSION['user']) && $_SESSION['user']['user_type'] == 'admin' ) {
  return true;
 }else{
  return false;
 }
}
Now you might say, if only an admin can create another admin, then who creates the first admin. Well to create the first admin, you can create a normal user using the registration form, then use any mysql client like phpmyadmin or the mysql command prompt and change the user_type to admin. That way you will be able to log in as admin and create other admins.
As simple as that, we are done with building a system that manages normal users alongside admin users.
Conclusion
I hope this tutorial was helpful to you. I am glad you actually followed it through to the end. Feel free to examine the code, customize it to suit your needs and use it in your projects. If you have any issues or comments or any remarks at all about this tutorial, leave it in the comments below.
Best wishes!


0 Comments
Comment shows what you think ... So please comment